Letter Mail Shipping Available
 Security policy
No data sold or shared. NO SPAM!
 Economy Shipping
Sent by Letter Mail - No Tracking
 Return policy
90-day money back guarantee
.png) USD
USD
$ Indicates prices are in USD
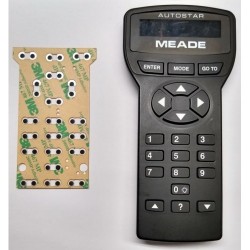
Compatible with older Denon remotes that have 9 rows of up to 4 buttons across
RC113, RC164, RC206, RC211, RC215, RC217, RC229, RC233, RC241, RC246, RC259 (not a complete list)
Do-It-Yourself
Permanently repairs rubber keypad buttons by replacing the conductive material.
Your buttons fails when the conductive pad wears out and silicone oils seep from the keypad. This gooey paste blocks electrical conductivity and stops the switch from working.
The ButtonWorx membrane keypad blocks dirt and oil from reaching the circuit board and offers a new conductor that cannot break down like rubber conductors do.
Note: This is for repairing hard to press buttons. If all your buttons stopped working one day, then the remote is broken (not the buttons) and needs repair
Our membrane keypads are custom cut for each model.
Use a plastic card to open housing
Start at the bottom corner and slide the card up the side. The housing will pull apart a little. Then do the bottom edge, then the other side.
IMPORTANT: CLEAN THE CIRCUIT BOARD WITH ISOPROPYL ALCOHOL
Install the ButtonWorx™ repair membrane FLAT FLAT FLAT. There is no need to make sure it is stuck down.
Do Not press down on the button areas. That can cause buttons to cave in creating a permanent short circuit.
Just place it down using the holes for alignment. If it needs to be repositioned you can remove it and try again.
When putting it back together the only tricky part is making sure the battery springs go into the slots in the housing.
RC113, RC164, RC206, RC211, RC215, RC217, RC229, RC233, RC241, RC246, RC259,
RC-113, RC-164, RC-206, RC-211, RC-215, RC-217, RC-229, RC-233, RC-241, RC-246, RC-259
Letter Mail Shipping Available